Java面试宝典-框架篇

Java面试宝典-框架篇
Pei框架篇
1. Spring refresh 流程
要求
- 掌握 refresh 的 12 个步骤
Spring refresh 概述
refresh 是 AbstractApplicationContext 中的一个方法,负责初始化 ApplicationContext 容器,容器必须调用 refresh 才能正常工作。它的内部主要会调用 12 个方法,我们把它们称为 refresh 的 12 个步骤:
prepareRefresh
obtainFreshBeanFactory
prepareBeanFactory
postProcessBeanFactory
invokeBeanFactoryPostProcessors
registerBeanPostProcessors
initMessageSource
initApplicationEventMulticaster
onRefresh
registerListeners
finishBeanFactoryInitialization
finishRefresh
功能分类
1 为准备环境
2 3 4 5 6 为准备 BeanFactory
7 8 9 10 12 为准备 ApplicationContext
11 为初始化 BeanFactory 中非延迟单例 bean
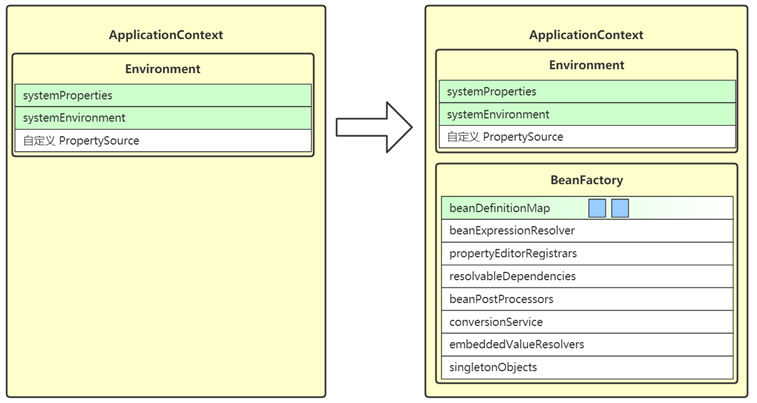
1. prepareRefresh
这一步创建和准备了 Environment 对象,它作为 ApplicationContext 的一个成员变量
Environment 对象的作用之一是为后续 @Value,值注入时提供键值
Environment 分成三个主要部分
- systemProperties - 保存 java 环境键值
- systemEnvironment - 保存系统环境键值
- 自定义 PropertySource - 保存自定义键值,例如来自于 *.properties 文件的键值

2. obtainFreshBeanFactory
- 这一步获取(或创建) BeanFactory,它也是作为 ApplicationContext 的一个成员变量
- BeanFactory 的作用是负责 bean 的创建、依赖注入和初始化,bean 的各项特征由 BeanDefinition 定义
- BeanDefinition 作为 bean 的设计蓝图,规定了 bean 的特征,如单例多例、依赖关系、初始销毁方法等
- BeanDefinition 的来源有多种多样,可以是通过 xml 获得、配置类获得、组件扫描获得,也可以是编程添加
- 所有的 BeanDefinition 会存入 BeanFactory 中的 beanDefinitionMap 集合
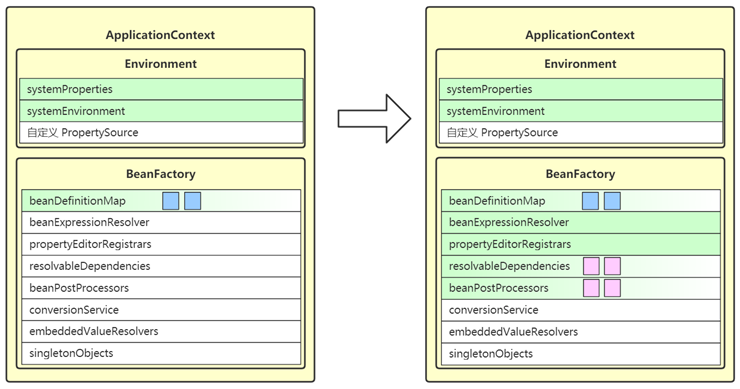
3. prepareBeanFactory
- 这一步会进一步完善 BeanFactory,为它的各项成员变量赋值
- beanExpressionResolver 用来解析 SpEL,常见实现为 StandardBeanExpressionResolver
- propertyEditorRegistrars 会注册类型转换器
- 它在这里使用了 ResourceEditorRegistrar 实现类
- 并应用 ApplicationContext 提供的 Environment 完成 ${ } 解析
- registerResolvableDependency 来注册 beanFactory 以及 ApplicationContext,让它们也能用于依赖注入
- beanPostProcessors 是 bean 后处理器集合,会工作在 bean 的生命周期各个阶段,此处会添加两个:
- ApplicationContextAwareProcessor 用来解析 Aware 接口
- ApplicationListenerDetector 用来识别容器中 ApplicationListener 类型的 bean
4. postProcessBeanFactory
- 这一步是空实现,留给子类扩展。
- 一般 Web 环境的 ApplicationContext 都要利用它注册新的 Scope,完善 Web 下的 BeanFactory
- 这里体现的是模板方法设计模式
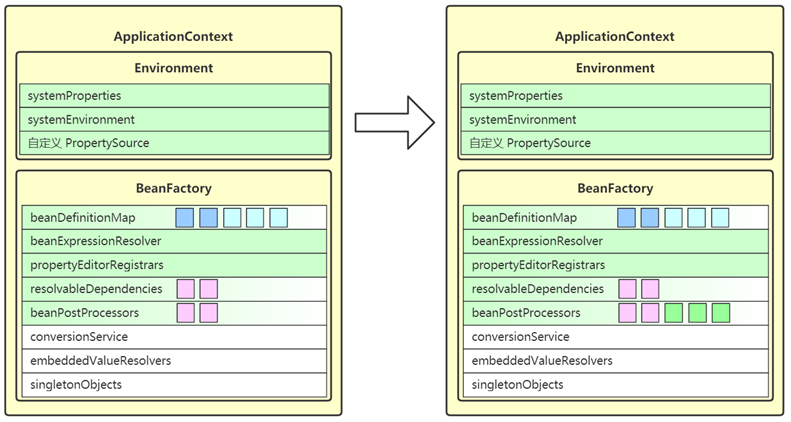
5. invokeBeanFactoryPostProcessors
- 这一步会调用 beanFactory 后处理器
- beanFactory 后处理器,充当 beanFactory 的扩展点,可以用来补充或修改 BeanDefinition
- 常见的 beanFactory 后处理器有
- ConfigurationClassPostProcessor – 解析 @Configuration、@Bean、@Import、@PropertySource 等
- PropertySourcesPlaceHolderConfigurer – 替换 BeanDefinition 中的 ${ }
- MapperScannerConfigurer – 补充 Mapper 接口对应的 BeanDefinition

6. registerBeanPostProcessors
- 这一步是继续从 beanFactory 中找出 bean 后处理器,添加至 beanPostProcessors 集合中
- bean 后处理器,充当 bean 的扩展点,可以工作在 bean 的实例化、依赖注入、初始化阶段,常见的有:
- AutowiredAnnotationBeanPostProcessor 功能有:解析 @Autowired,@Value 注解
- CommonAnnotationBeanPostProcessor 功能有:解析 @Resource,@PostConstruct,@PreDestroy
- AnnotationAwareAspectJAutoProxyCreator 功能有:为符合切点的目标 bean 自动创建代理
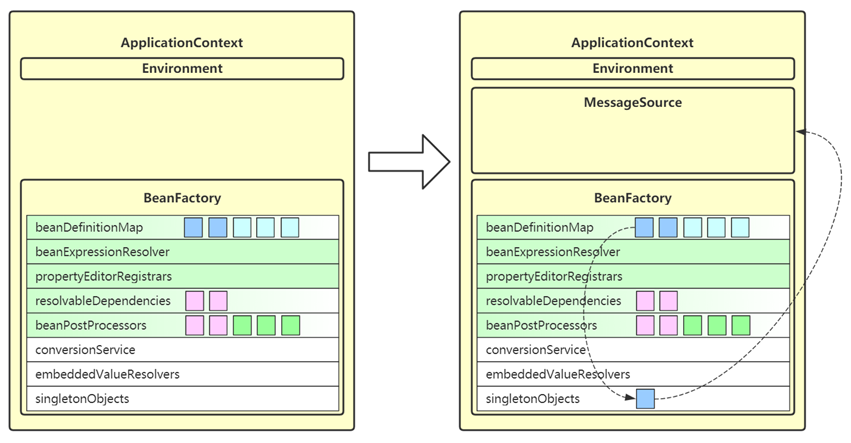
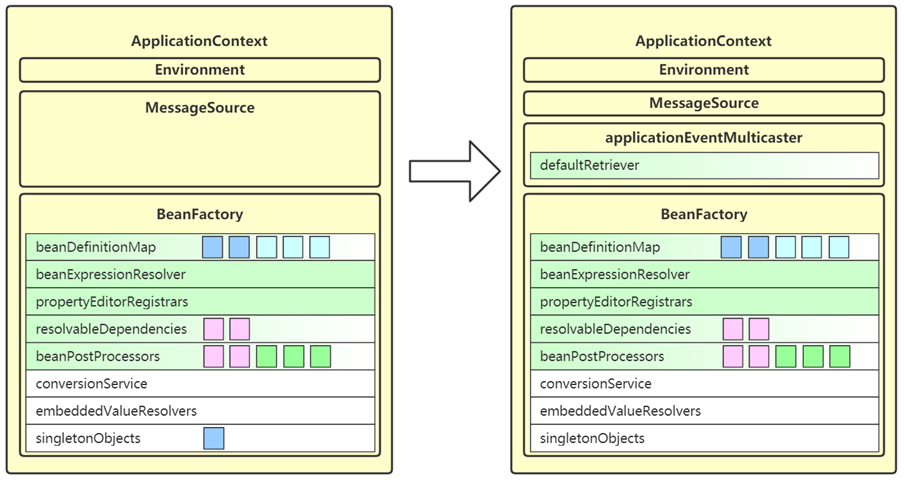
7. initMessageSource
- 这一步是为 ApplicationContext 添加 messageSource 成员,实现国际化功能
- 去 beanFactory 内找名为 messageSource 的 bean,如果没有,则提供空的 MessageSource 实现
8. initApplicationContextEventMulticaster
- 这一步为 ApplicationContext 添加事件广播器成员,即 applicationContextEventMulticaster
- 它的作用是发布事件给监听器
- 去 beanFactory 找名为 applicationEventMulticaster 的 bean 作为事件广播器,若没有,会创建默认的事件广播器
- 之后就可以调用 ApplicationContext.publishEvent(事件对象) 来发布事件
9. onRefresh
- 这一步是空实现,留给子类扩展
- SpringBoot 中的子类在这里准备了 WebServer,即内嵌 web 容器
- 体现的是模板方法设计模式
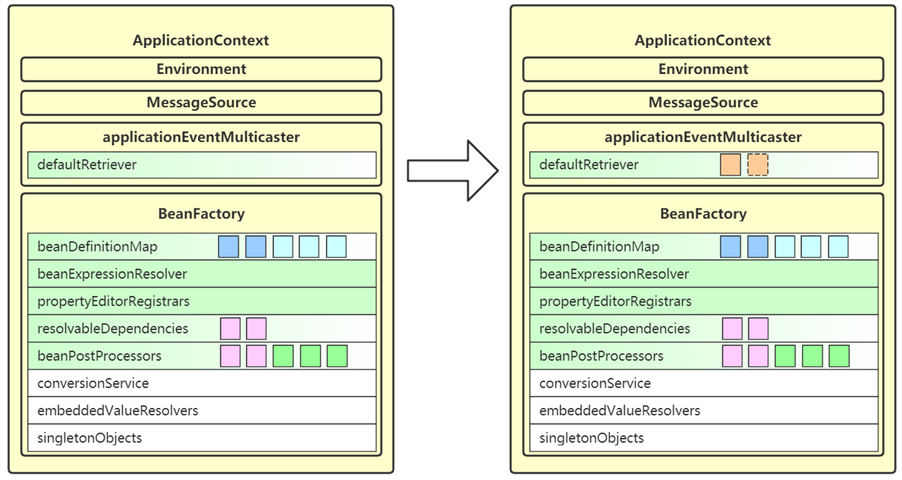
10. registerListeners
- 这一步会从多种途径找到事件监听器,并添加至 applicationEventMulticaster
- 事件监听器顾名思义,用来接收事件广播器发布的事件,有如下来源
- 事先编程添加的
- 来自容器中的 bean
- 来自于 @EventListener 的解析
- 要实现事件监听器,只需要实现 ApplicationListener 接口,重写其中 onApplicationEvent(E e) 方法即可
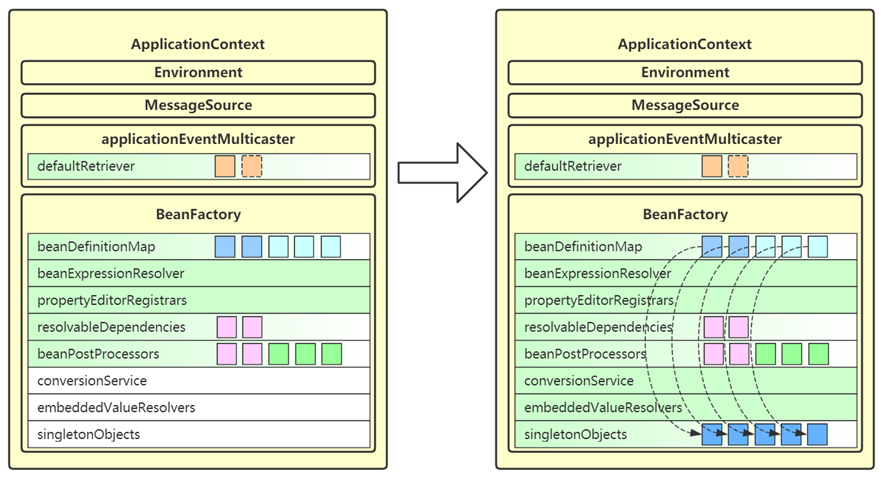
11. finishBeanFactoryInitialization
- 这一步会将 beanFactory 的成员补充完毕,并初始化所有非延迟单例 bean
- conversionService 也是一套转换机制,作为对 PropertyEditor 的补充
- embeddedValueResolvers 即内嵌值解析器,用来解析 @Value 中的 ${ },借用的是 Environment 的功能
- singletonObjects 即单例池,缓存所有单例对象
- 对象的创建都分三个阶段,每一阶段都有不同的 bean 后处理器参与进来,扩展功能
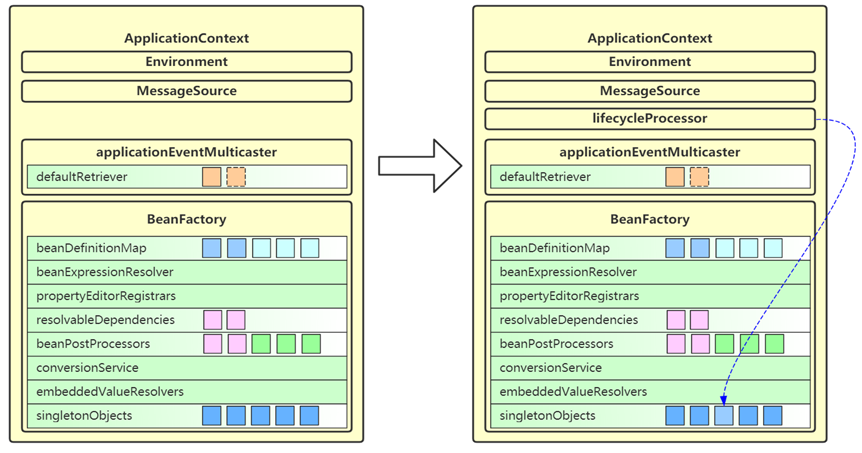
12. finishRefresh
- 这一步会为 ApplicationContext 添加 lifecycleProcessor 成员,用来控制容器内需要生命周期管理的 bean
- 如果容器中有名称为 lifecycleProcessor 的 bean 就用它,否则创建默认的生命周期管理器
- 准备好生命周期管理器,就可以实现
- 调用 context 的 start,即可触发所有实现 LifeCycle 接口 bean 的 start
- 调用 context 的 stop,即可触发所有实现 LifeCycle 接口 bean 的 stop
- 发布 ContextRefreshed 事件,整个 refresh 执行完成
2. Spring bean 生命周期
要求
- 掌握 Spring bean 的生命周期
bean 生命周期 概述
bean 的生命周期从调用 beanFactory 的 getBean 开始,到这个 bean 被销毁,可以总结为以下七个阶段:
- 处理名称,检查缓存
- 处理父子容器
- 处理 dependsOn
- 选择 scope 策略
- 创建 bean
- 类型转换处理
- 销毁 bean
注意
- 划分的阶段和名称并不重要,重要的是理解整个过程中做了哪些事情
1. 处理名称,检查缓存
- 这一步会处理别名,将别名解析为实际名称
- 对 FactoryBean 也会特殊处理,如果以 & 开头表示要获取 FactoryBean 本身,否则表示要获取其产品
- 这里针对单例对象会检查一级、二级、三级缓存
- singletonFactories 三级缓存,存放单例工厂对象
- earlySingletonObjects 二级缓存,存放单例工厂的产品对象
- 如果发生循环依赖,产品是代理;无循环依赖,产品是原始对象
- singletonObjects 一级缓存,存放单例成品对象
2. 处理父子容器
- 如果当前容器根据名字找不到这个 bean,此时若父容器存在,则执行父容器的 getBean 流程
- 父子容器的 bean 名称可以重复
3. 处理 dependsOn
- 如果当前 bean 有通过 dependsOn 指定了非显式依赖的 bean,这一步会提前创建这些 dependsOn 的 bean
- 所谓非显式依赖,就是指两个 bean 之间不存在直接依赖关系,但需要控制它们的创建先后顺序
4. 选择 scope 策略
- 对于 singleton scope,首先到单例池去获取 bean,如果有则直接返回,没有再进入创建流程
- 对于 prototype scope,每次都会进入创建流程
- 对于自定义 scope,例如 request,首先到 request 域获取 bean,如果有则直接返回,没有再进入创建流程
5.1 创建 bean - 创建 bean 实例
| 要点 | 总结 |
|---|---|
| 有自定义 TargetSource 的情况 | 由 AnnotationAwareAspectJAutoProxyCreator 创建代理返回 |
| Supplier 方式创建 bean 实例 | 为 Spring 5.0 新增功能,方便编程方式创建 bean 实例 |
| FactoryMethod 方式 创建 bean 实例 | ① 分成静态工厂与实例工厂;② 工厂方法若有参数,需要对工厂方法参数进行解析,利用 resolveDependency;③ 如果有多个工厂方法候选者,还要进一步按权重筛选 |
| AutowiredAnnotationBeanPostProcessor | ① 优先选择带 @Autowired 注解的构造;② 若有唯一的带参构造,也会入选 |
| mbd.getPreferredConstructors | 选择所有公共构造,这些构造之间按权重筛选 |
| 采用默认构造 | 如果上面的后处理器和 BeanDefiniation 都没找到构造,采用默认构造,即使是私有的 |
5.2 创建 bean - 依赖注入
| 要点 | 总结 |
|---|---|
| AutowiredAnnotationBeanPostProcessor | 识别 @Autowired 及 @Value 标注的成员,封装为 InjectionMetadata 进行依赖注入 |
| CommonAnnotationBeanPostProcessor | 识别 @Resource 标注的成员,封装为 InjectionMetadata 进行依赖注入 |
| resolveDependency | 用来查找要装配的值,可以识别:① Optional;② ObjectFactory 及 ObjectProvider;③ @Lazy 注解;④ @Value 注解(${ }, #{ }, 类型转换);⑤ 集合类型(Collection,Map,数组等);⑥ 泛型和 @Qualifier(用来区分类型歧义);⑦ primary 及名字匹配(用来区分类型歧义) |
| AUTOWIRE_BY_NAME | 根据成员名字找 bean 对象,修改 mbd 的 propertyValues,不会考虑简单类型的成员 |
| AUTOWIRE_BY_TYPE | 根据成员类型执行 resolveDependency 找到依赖注入的值,修改 mbd 的 propertyValues |
| applyPropertyValues | 根据 mbd 的 propertyValues 进行依赖注入(即xml中 `<property name ref |
5.3 创建 bean - 初始化
| 要点 | 总结 |
|---|---|
| 内置 Aware 接口的装配 | 包括 BeanNameAware,BeanFactoryAware 等 |
| 扩展 Aware 接口的装配 | 由 ApplicationContextAwareProcessor 解析,执行时机在 postProcessBeforeInitialization |
| @PostConstruct | 由 CommonAnnotationBeanPostProcessor 解析,执行时机在 postProcessBeforeInitialization |
| InitializingBean | 通过接口回调执行初始化 |
| initMethod | 根据 BeanDefinition 得到的初始化方法执行初始化,即 <bean init-method> 或 @Bean(initMethod) |
| 创建 aop 代理 | 由 AnnotationAwareAspectJAutoProxyCreator 创建,执行时机在 postProcessAfterInitialization |
5.4 创建 bean - 注册可销毁 bean
在这一步判断并登记可销毁 bean
- 判断依据
- 如果实现了 DisposableBean 或 AutoCloseable 接口,则为可销毁 bean
- 如果自定义了 destroyMethod,则为可销毁 bean
- 如果采用 @Bean 没有指定 destroyMethod,则采用自动推断方式获取销毁方法名(close,shutdown)
- 如果有 @PreDestroy 标注的方法
- 存储位置
- singleton scope 的可销毁 bean 会存储于 beanFactory 的成员当中
- 自定义 scope 的可销毁 bean 会存储于对应的域对象当中
- prototype scope 不会存储,需要自己找到此对象销毁
- 存储时都会封装为 DisposableBeanAdapter 类型对销毁方法的调用进行适配
6. 类型转换处理
- 如果 getBean 的 requiredType 参数与实际得到的对象类型不同,会尝试进行类型转换
7. 销毁 bean
- 销毁时机
- singleton bean 的销毁在 ApplicationContext.close 时,此时会找到所有 DisposableBean 的名字,逐一销毁
- 自定义 scope bean 的销毁在作用域对象生命周期结束时
- prototype bean 的销毁可以通过自己手动调用 AutowireCapableBeanFactory.destroyBean 方法执行销毁
- 同一 bean 中不同形式销毁方法的调用次序
- 优先后处理器销毁,即 @PreDestroy
- 其次 DisposableBean 接口销毁
- 最后 destroyMethod 销毁(包括自定义名称,推断名称,AutoCloseable 接口 多选一)
3. Spring bean 循环依赖
要求
- 掌握单例 set 方式循环依赖的原理
- 掌握其它循环依赖的解决方法
循环依赖的产生
- 首先要明白,bean 的创建要遵循一定的步骤,必须是创建、注入、初始化三步,这些顺序不能乱
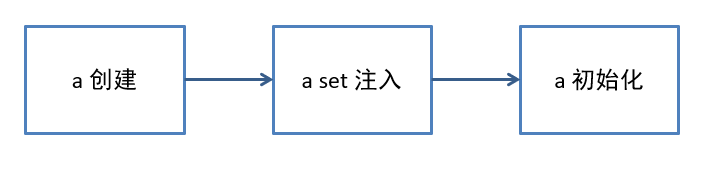
set 方法(包括成员变量)的循环依赖如图所示
可以在【a 创建】和【a set 注入 b】之间加入 b 的整个流程来解决
【b set 注入 a】 时可以成功,因为之前 a 的实例已经创建完毕
a 的顺序,及 b 的顺序都能得到保障

- 构造方法的循环依赖如图所示,显然无法用前面的方法解决
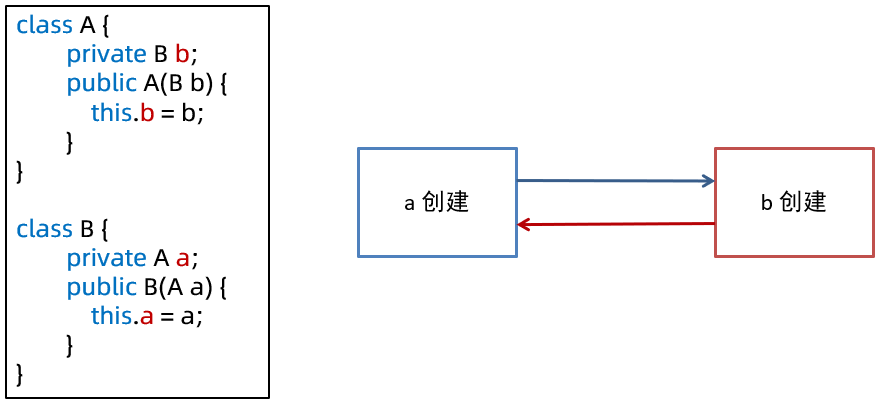
构造循环依赖的解决
- 思路1
- a 注入 b 的代理对象,这样能够保证 a 的流程走通
- 后续需要用到 b 的真实对象时,可以通过代理间接访问

- 思路2
- a 注入 b 的工厂对象,让 b 的实例创建被推迟,这样能够保证 a 的流程先走通
- 后续需要用到 b 的真实对象时,再通过 ObjectFactory 工厂间接访问

- 示例1:用 @Lazy 为构造方法参数生成代理
1 | public class App60_1 { |
- 示例2:用 ObjectProvider 延迟依赖对象的创建
1 | public class App60_2 { |
- 示例3:用 @Scope 产生代理
1 | public class App60_3 { |
1 |
|
1 |
|
- 示例4:用 Provider 接口解决,原理上与 ObjectProvider 一样,Provider 接口是独立的 jar 包,需要加入依赖
1 | <dependency> |
1 | public class App60_4 { |
解决 set 循环依赖的原理
一级缓存
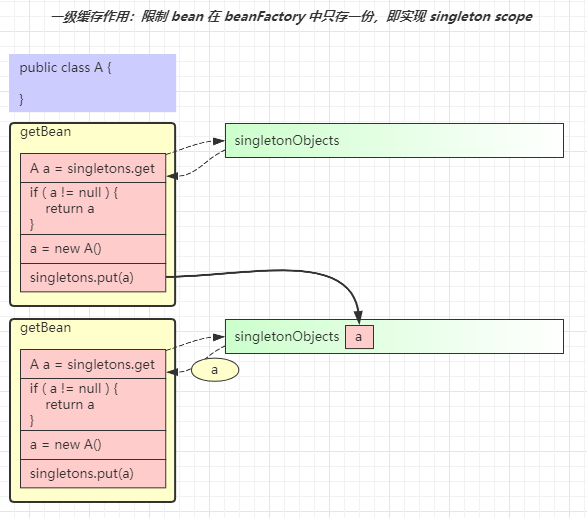
作用是保证单例对象仅被创建一次
- 第一次走
getBean("a")流程后,最后会将成品 a 放入 singletonObjects 一级缓存 - 后续再走
getBean("a")流程时,先从一级缓存中找,这时已经有成品 a,就无需再次创建
一级缓存与循环依赖
一级缓存无法解决循环依赖问题,分析如下
- 无论是获取 bean a 还是获取 bean b,走的方法都是同一个 getBean 方法,假设先走
getBean("a") - 当 a 的实例对象创建,接下来执行
a.setB()时,需要走getBean("b")流程,红色箭头 1 - 当 b 的实例对象创建,接下来执行
b.setA()时,又回到了getBean("a")的流程,红色箭头 2 - 但此时 singletonObjects 一级缓存内没有成品的 a,陷入了死循环
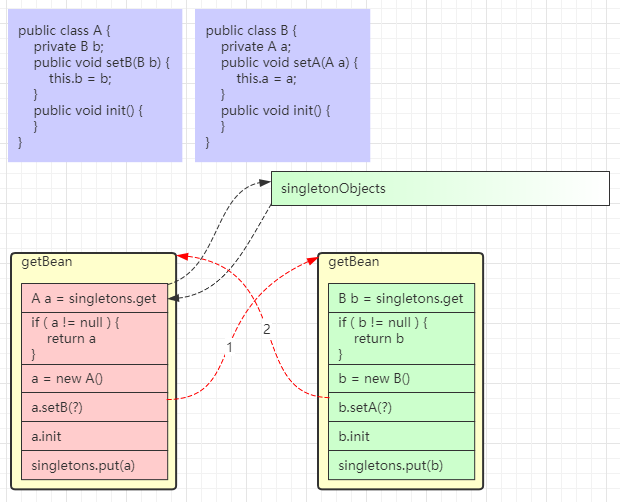
二级缓存
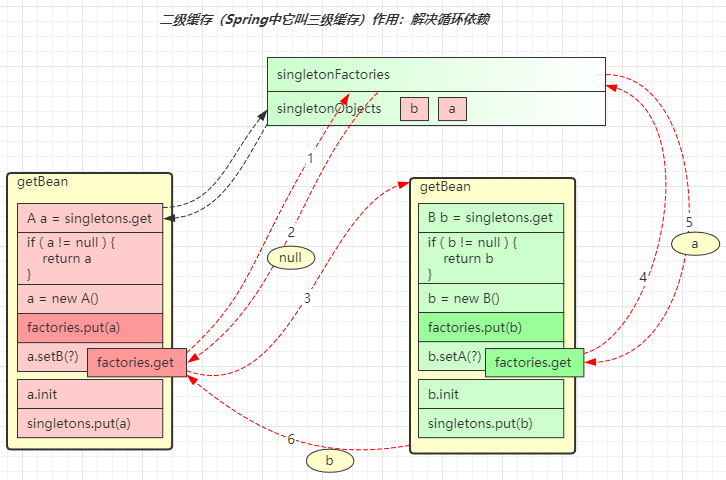
解决思路如下:
- 再增加一个 singletonFactories 缓存
- 在依赖注入前,即
a.setB()以及b.setA()将 a 及 b 的半成品对象(未完成依赖注入和初始化)放入此缓存 - 执行依赖注入时,先看看 singletonFactories 缓存中是否有半成品的对象,如果有拿来注入,顺利走完流程
对于上面的图
a = new A()执行之后就会把这个半成品的 a 放入 singletonFactories 缓存,即factories.put(a)- 接下来执行
a.setB(),走入getBean("b")流程,红色箭头 3 - 这回再执行到
b.setA()时,需要一个 a 对象,有没有呢?有! factories.get()在 singletonFactories 缓存中就可以找到,红色箭头 4 和 5- b 的流程能够顺利走完,将 b 成品放入 singletonObject 一级缓存,返回到 a 的依赖注入流程,红色箭头 6
二级缓存与创建代理
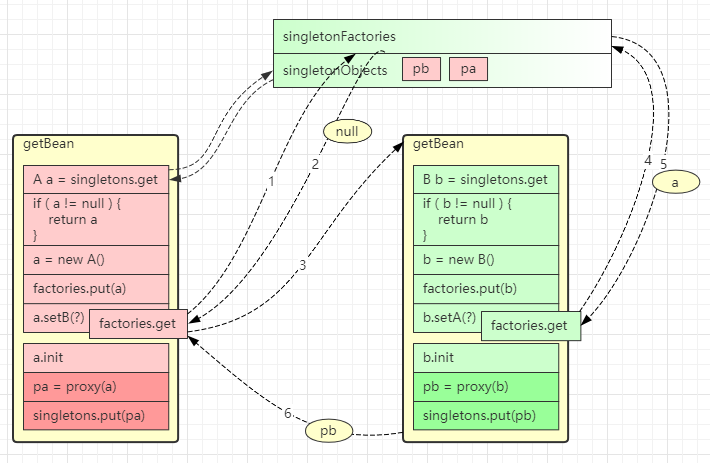
二级缓存无法正确处理循环依赖并且包含有代理创建的场景,分析如下
- spring 默认要求,在
a.init完成之后才能创建代理pa = proxy(a) - 由于 a 的代理创建时机靠后,在执行
factories.put(a)向 singletonFactories 中放入的还是原始对象 - 接下来箭头 3、4、5 这几步 b 对象拿到和注入的都是原始对象
三级缓存
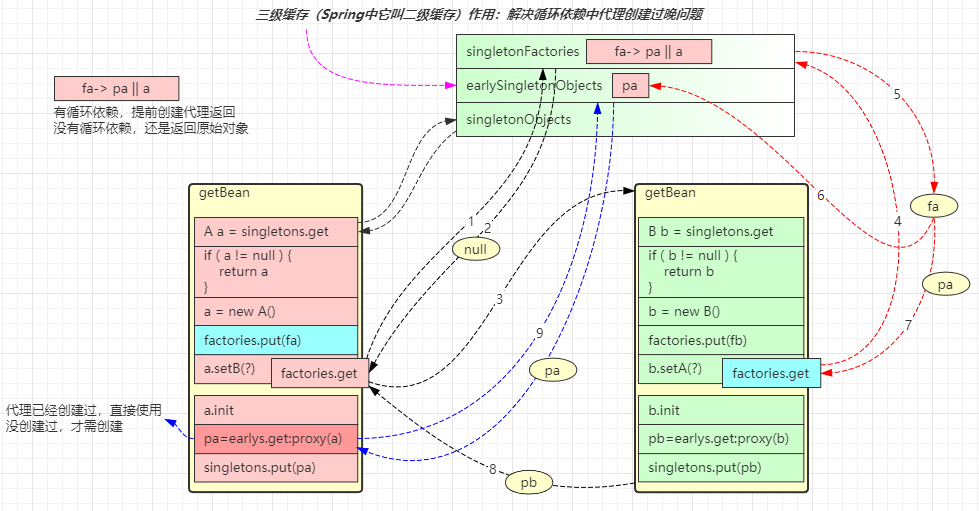
简单分析的话,只需要将代理的创建时机放在依赖注入之前即可,但 spring 仍然希望代理的创建时机在 init 之后,只有出现循环依赖时,才会将代理的创建时机提前。所以解决思路稍显复杂:
- 图中
factories.put(fa)放入的既不是原始对象,也不是代理对象而是工厂对象 fa - 当检查出发生循环依赖时,fa 的产品就是代理 pa,没有发生循环依赖,fa 的产品是原始对象 a
- 假设出现了循环依赖,拿到了 singletonFactories 中的工厂对象,通过在依赖注入前获得了 pa,红色箭头 5
- 这回
b.setA()注入的就是代理对象,保证了正确性,红色箭头 7 - 还需要把 pa 存入新加的 earlySingletonObjects 缓存,红色箭头 6
a.init完成后,无需二次创建代理,从哪儿找到 pa 呢?earlySingletonObjects 已经缓存,蓝色箭头 9
当成品对象产生,放入 singletonObject 后,singletonFactories 和 earlySingletonObjects 就中的对象就没有用处,清除即可
4. Spring 事务失效
要求
- 掌握事务失效的八种场景
1. 抛出检查异常导致事务不能正确回滚
1 |
|
原因:Spring 默认只会回滚非检查异常
解法:配置 rollbackFor 属性
@Transactional(rollbackFor = Exception.class)
2. 业务方法内自己 try-catch 异常导致事务不能正确回滚
1 |
|
原因:事务通知只有捉到了目标抛出的异常,才能进行后续的回滚处理,如果目标自己处理掉异常,事务通知无法知悉
解法1:异常原样抛出
- 在 catch 块添加
throw new RuntimeException(e);
- 在 catch 块添加
解法2:手动设置 TransactionStatus.setRollbackOnly()
- 在 catch 块添加
TransactionInterceptor.currentTransactionStatus().setRollbackOnly();
- 在 catch 块添加
3. aop 切面顺序导致导致事务不能正确回滚
1 |
|
1 |
|
原因:事务切面优先级最低,但如果自定义的切面优先级和他一样,则还是自定义切面在内层,这时若自定义切面没有正确抛出异常…
解法1、2:同情况2 中的解法:1、2
解法3:调整切面顺序,在 MyAspect 上添加
@Order(Ordered.LOWEST_PRECEDENCE - 1)(不推荐)
4. 非 public 方法导致的事务失效
1 |
|
原因:Spring 为方法创建代理、添加事务通知、前提条件都是该方法是 public 的
解法1:改为 public 方法
解法2:添加 bean 配置如下(不推荐)
1 |
|
5. 父子容器导致的事务失效
1 | package day04.tx.app.service; |
控制器类
1 | package day04.tx.app.controller; |
App 配置类
1 |
|
Web 配置类
1 |
|
现在配置了父子容器,WebConfig 对应子容器,AppConfig 对应父容器,发现事务依然失效
原因:子容器扫描范围过大,把未加事务配置的 service 扫描进来
解法1:各扫描各的,不要图简便
解法2:不要用父子容器,所有 bean 放在同一容器
6. 调用本类方法导致传播行为失效
1 |
|
原因:本类方法调用不经过代理,因此无法增强
解法1:依赖注入自己(代理)来调用
解法2:通过 AopContext 拿到代理对象,来调用
解法3:通过 CTW,LTW 实现功能增强
解法1
1 |
|
解法2,还需要在 AppConfig 上添加 @EnableAspectJAutoProxy(exposeProxy = true)
1 |
|
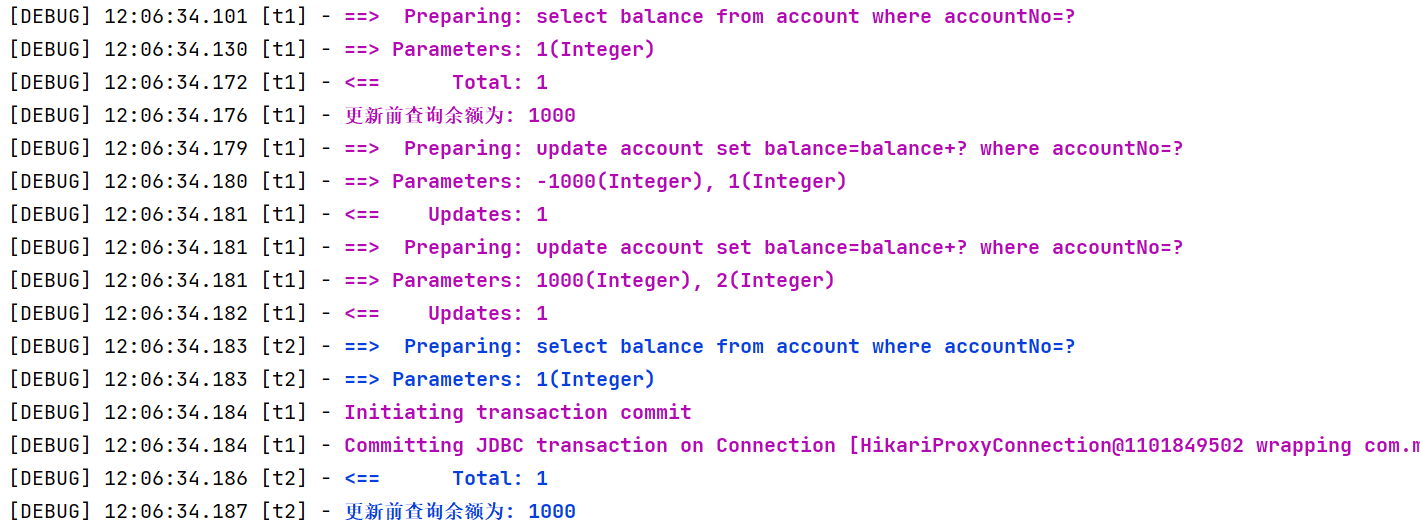
7. @Transactional 没有保证原子行为
1 |
|
上面的代码实际上是有 bug 的,假设 from 余额为 1000,两个线程都来转账 1000,可能会出现扣减为负数的情况
- 原因:事务的原子性仅涵盖 insert、update、delete、select … for update 语句,select 方法并不阻塞

- 如上图所示,红色线程和蓝色线程的查询都发生在扣减之前,都以为自己有足够的余额做扣减
8. @Transactional 方法导致的 synchronized 失效
针对上面的问题,能否在方法上加 synchronized 锁来解决呢?
1 |
|
答案是不行,原因如下:
- synchronized 保证的仅是目标方法的原子性,环绕目标方法的还有 commit 等操作,它们并未处于 sync 块内
- 可以参考下图发现,蓝色线程的查询只要在红色线程提交之前执行,那么依然会查询到有 1000 足够余额来转账
解法1:synchronized 范围应扩大至代理方法调用
解法2:使用 select … for update 替换 select
5. Spring MVC 执行流程
要求
- 掌握 Spring MVC 的执行流程
- 了解 Spring MVC 的重要组件的作用
概要
我把整个流程分成三个阶段
- 准备阶段
- 匹配阶段
- 执行阶段
准备阶段
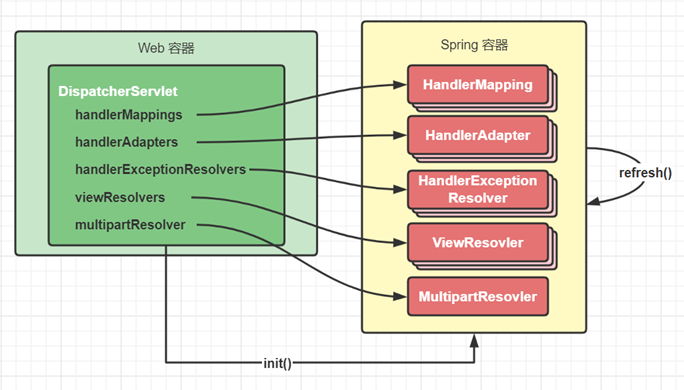
在 Web 容器第一次用到 DispatcherServlet 的时候,会创建其对象并执行 init 方法
init 方法内会创建 Spring Web 容器,并调用容器 refresh 方法
refresh 过程中会创建并初始化 SpringMVC 中的重要组件, 例如 MultipartResolver,HandlerMapping,HandlerAdapter,HandlerExceptionResolver、ViewResolver 等
容器初始化后,会将上一步初始化好的重要组件,赋值给 DispatcherServlet 的成员变量,留待后用
匹配阶段
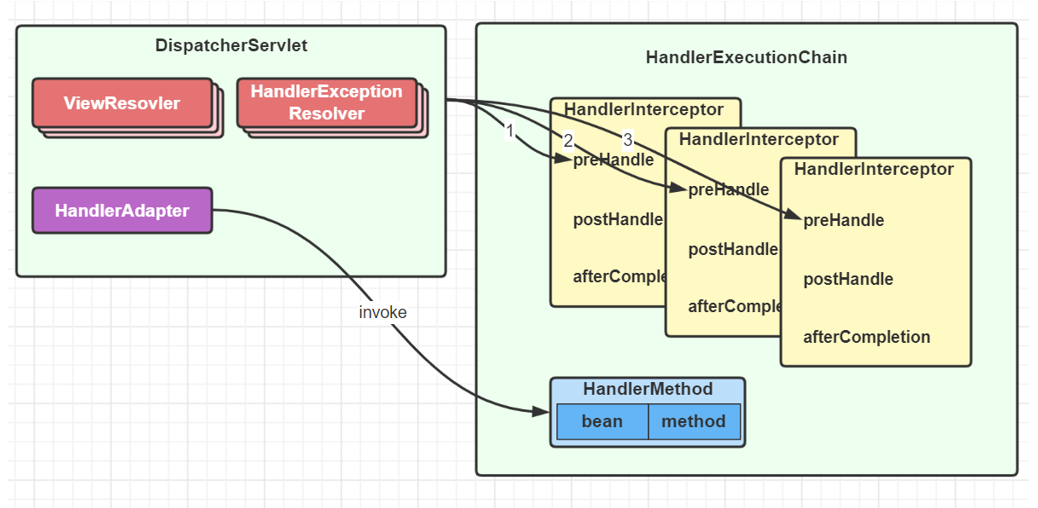
用户发送的请求统一到达前端控制器 DispatcherServlet
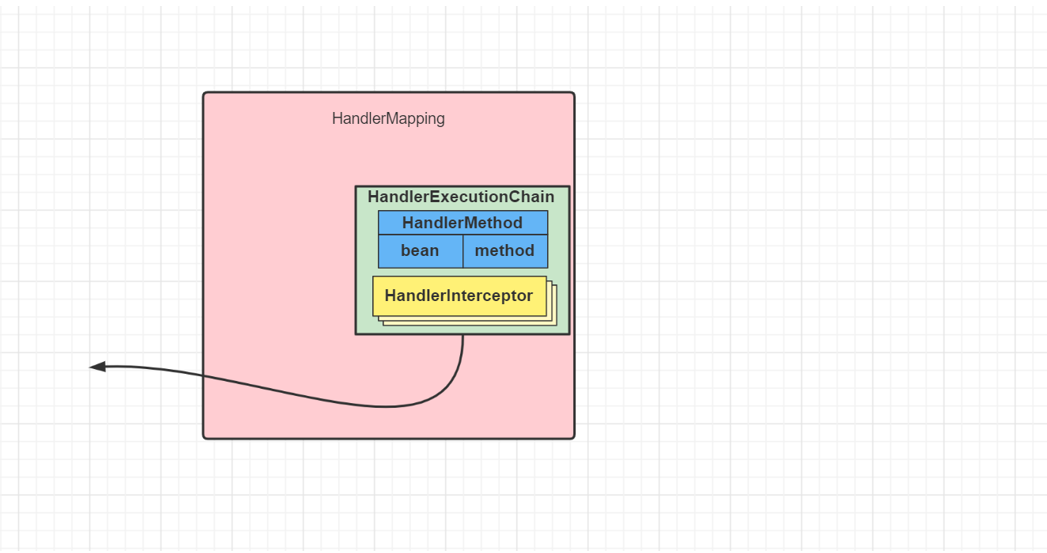
DispatcherServlet 遍历所有 HandlerMapping ,找到与路径匹配的处理器
① HandlerMapping 有多个,每个 HandlerMapping 会返回不同的处理器对象,谁先匹配,返回谁的处理器。其中能识别 @RequestMapping 的优先级最高
② 对应 @RequestMapping 的处理器是 HandlerMethod,它包含了控制器对象和控制器方法信息
③ 其中路径与处理器的映射关系在 HandlerMapping 初始化时就会建立好

- 将 HandlerMethod 连同匹配到的拦截器,生成调用链对象 HandlerExecutionChain 返回
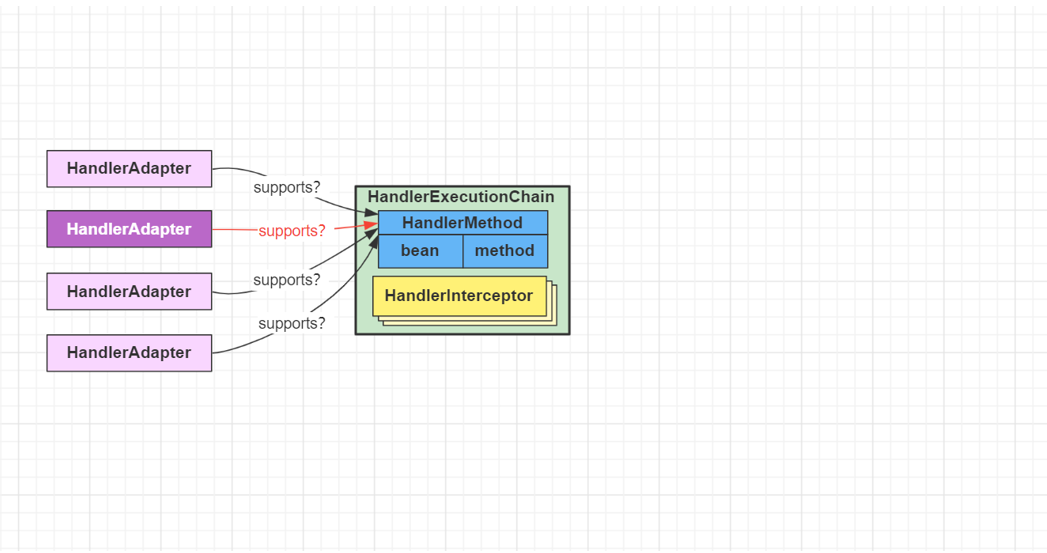
- 遍历HandlerAdapter 处理器适配器,找到能处理 HandlerMethod 的适配器对象,开始调用
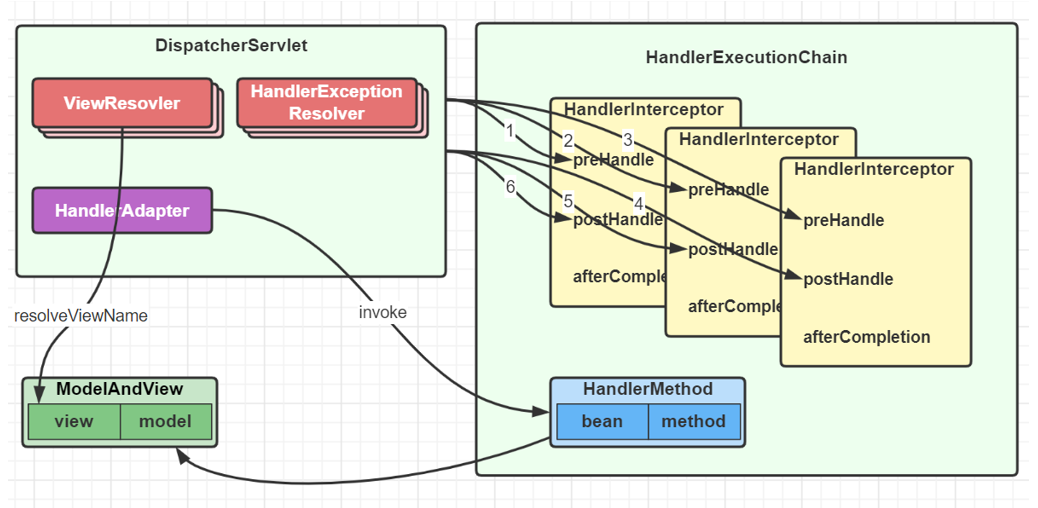
调用阶段
- 执行拦截器 preHandle
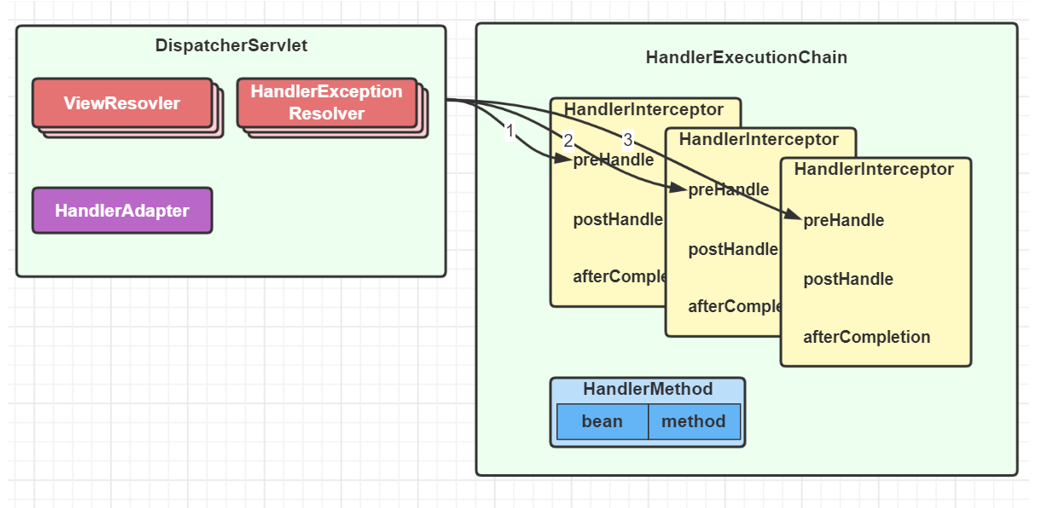
由 HandlerAdapter 调用 HandlerMethod
① 调用前处理不同类型的参数
② 调用后处理不同类型的返回值
第 2 步没有异常
① 返回 ModelAndView
② 执行拦截器 postHandle 方法
③ 解析视图,得到 View 对象,进行视图渲染
- 第 2 步有异常,进入 HandlerExceptionResolver 异常处理流程
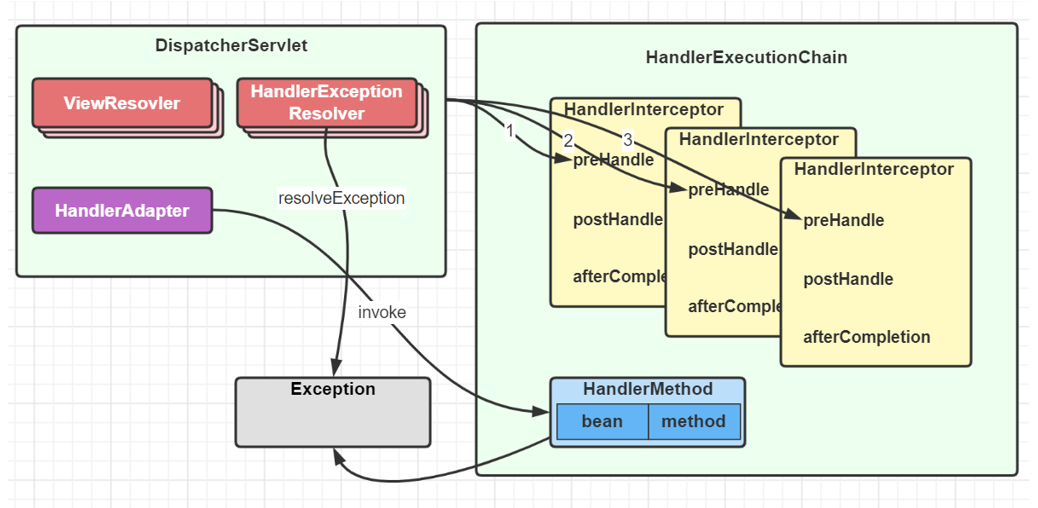
最后都会执行拦截器的 afterCompletion 方法
如果控制器方法标注了 @ResponseBody 注解,则在第 2 步,就会生成 json 结果,并标记 ModelAndView 已处理,这样就不会执行第 3 步的视图渲染
6. Spring 注解
要求
- 掌握 Spring 常见注解
提示
- 注解的详细列表请参考:面试题-spring-注解.xmind
- 下面列出了视频中重点提及的注解,考虑到大部分注解同学们已经比较熟悉了,仅对个别的作简要说明
事务注解
- @EnableTransactionManagement,会额外加载 4 个 bean
- BeanFactoryTransactionAttributeSourceAdvisor 事务切面类
- TransactionAttributeSource 用来解析事务属性
- TransactionInterceptor 事务拦截器
- TransactionalEventListenerFactory 事务监听器工厂
- @Transactional
核心
- @Order
切面
- @EnableAspectJAutoProxy
- 会加载 AnnotationAwareAspectJAutoProxyCreator,它是一个 bean 后处理器,用来创建代理
- 如果没有配置 @EnableAspectJAutoProxy,又需要用到代理(如事务)则会使用 InfrastructureAdvisorAutoProxyCreator 这个 bean 后处理器
组件扫描与配置类
@Component
@Controller
@Service
@Repository
@ComponentScan
@Conditional
@Configuration
- 配置类其实相当于一个工厂, 标注 @Bean 注解的方法相当于工厂方法
- @Bean 不支持方法重载, 如果有多个重载方法, 仅有一个能入选为工厂方法
- @Configuration 默认会为标注的类生成代理, 其目的是保证 @Bean 方法相互调用时, 仍然能保证其单例特性
- @Configuration 中如果含有 BeanFactory 后处理器, 则实例工厂方法会导致 MyConfig 提前创建, 造成其依赖注入失败,解决方法是改用静态工厂方法或直接为 @Bean 的方法参数依赖注入, 针对 Mapper 扫描可以改用注解方式
@Bean
@Import
四种用法
① 引入单个 bean
② 引入一个配置类
③ 通过 Selector 引入多个类
④ 通过 beanDefinition 注册器
解析规则
- 同一配置类中, @Import 先解析 @Bean 后解析
- 同名定义, 默认后面解析的会覆盖前面解析的
- 不允许覆盖的情况下, 如何能够让 MyConfig(主配置类) 的配置优先? (虽然覆盖方式能解决)
- 采用 DeferredImportSelector,因为它最后工作, 可以简单认为先解析 @Bean, 再 Import
@Lazy
- 加在类上,表示此类延迟实例化、初始化
- 加在方法参数上,此参数会以代理方式注入
@PropertySource
依赖注入
- @Autowired
- @Qualifier
- @Value
mvc mapping
- @RequestMapping,可以派生多个注解如 @GetMapping 等
mvc rest
- @RequestBody
- @ResponseBody,组合 @Controller => @RestController
- @ResponseStatus
mvc 统一处理
- @ControllerAdvice,组合 @ResponseBody => @RestControllerAdvice
- @ExceptionHandler
mvc 参数
- @PathVariable
mvc ajax
- @CrossOrigin
boot auto
- @SpringBootApplication
- @EnableAutoConfiguration
- @SpringBootConfiguration
boot condition
- @ConditionalOnClass,classpath 下存在某个 class 时,条件才成立
- @ConditionalOnMissingBean,beanFactory 内不存在某个 bean 时,条件才成立
- @ConditionalOnProperty,配置文件中存在某个 property(键、值)时,条件才成立
boot properties
- @ConfigurationProperties,会将当前 bean 的属性与配置文件中的键值进行绑定
- @EnableConfigurationProperties,会添加两个较为重要的 bean
- ConfigurationPropertiesBindingPostProcessor,bean 后处理器,在 bean 初始化前调用下面的 binder
- ConfigurationPropertiesBinder,真正执行绑定操作
7. SpringBoot 自动配置原理
要求
- 掌握 SpringBoot 自动配置原理
自动配置原理
@SpringBootConfiguration 是一个组合注解,由 @ComponentScan、@EnableAutoConfiguration 和 @SpringBootConfiguration 组成
@SpringBootConfiguration 与普通 @Configuration 相比,唯一区别是前者要求整个 app 中只出现一次
@ComponentScan
- excludeFilters - 用来在组件扫描时进行排除,也会排除自动配置类
@EnableAutoConfiguration 也是一个组合注解,由下面注解组成
- @AutoConfigurationPackage – 用来记住扫描的起始包
- @Import(AutoConfigurationImportSelector.class) 用来加载
META-INF/spring.factories中的自动配置类
为什么不使用 @Import 直接引入自动配置类
有两个原因:
- 让主配置类和自动配置类变成了强耦合,主配置类不应该知道有哪些从属配置
- 直接用
@Import(自动配置类.class),引入的配置解析优先级较高,自动配置类的解析应该在主配置没提供时作为默认配置
因此,采用了 @Import(AutoConfigurationImportSelector.class)
- 由
AutoConfigurationImportSelector.class去读取META-INF/spring.factories中的自动配置类,实现了弱耦合。 - 另外
AutoConfigurationImportSelector.class实现了 DeferredImportSelector 接口,让自动配置的解析晚于主配置的解析
8. Spring 中的设计模式
要求
- 掌握 Spring 中常见的设计模式
1. Spring 中的 Singleton
请大家区分 singleton pattern 与 Spring 中的 singleton bean
- 根据单例模式的目的 Ensure a class only has one instance, and provide a global point of access to it
- 显然 Spring 中的 singleton bean 并非实现了单例模式,singleton bean 只能保证每个容器内,相同 id 的 bean 单实例
- 当然 Spring 中也用到了单例模式,例如
- org.springframework.transaction.TransactionDefinition#withDefaults
- org.springframework.aop.TruePointcut#INSTANCE
- org.springframework.aop.interceptor.ExposeInvocationInterceptor#ADVISOR
- org.springframework.core.annotation.AnnotationAwareOrderComparator#INSTANCE
- org.springframework.core.OrderComparator#INSTANCE
2. Spring 中的 Builder
定义 Separate the construction of a complex object from its representation so that the same construction process can create different representations
它的主要亮点有三处:
较为灵活的构建产品对象
在不执行最后 build 方法前,产品对象都不可用
构建过程采用链式调用,看起来比较爽
Spring 中体现 Builder 模式的地方:
org.springframework.beans.factory.support.BeanDefinitionBuilder
org.springframework.web.util.UriComponentsBuilder
org.springframework.http.ResponseEntity.HeadersBuilder
org.springframework.http.ResponseEntity.BodyBuilder
3. Spring 中的 Factory Method
定义 Define an interface for creating an object, but let subclasses decide which class to instantiate. Factory Method lets a class defer instantiation to subclasses
根据上面的定义,Spring 中的 ApplicationContext 与 BeanFactory 中的 getBean 都可以视为工厂方法,它隐藏了 bean (产品)的创建过程和具体实现
Spring 中其它工厂:
org.springframework.beans.factory.FactoryBean
@Bean 标注的静态方法及实例方法
ObjectFactory 及 ObjectProvider
前两种工厂主要封装第三方的 bean 的创建过程,后两种工厂可以推迟 bean 创建,解决循环依赖及单例注入多例等问题
4. Spring 中的 Adapter
定义 Convert the interface of a class into another interface clients expect. Adapter lets classes work together that couldn’t otherwise because of incompatible interfaces
典型的实现有两处:
- org.springframework.web.servlet.HandlerAdapter – 因为控制器实现有各种各样,比如有
- 大家熟悉的 @RequestMapping 标注的控制器实现
- 传统的基于 Controller 接口(不是 @Controller注解啊)的实现
- 较新的基于 RouterFunction 接口的实现
- 它们的处理方法都不一样,为了统一调用,必须适配为 HandlerAdapter 接口
- org.springframework.beans.factory.support.DisposableBeanAdapter – 因为销毁方法多种多样,因此都要适配为 DisposableBean 来统一调用销毁方法
5. Spring 中的 Composite
定义 Compose objects into tree structures to represent part-whole hierarchies. Composite lets clients treat individual objects and compositions of objects uniformly
典型实现有:
- org.springframework.web.method.support.HandlerMethodArgumentResolverComposite
- org.springframework.web.method.support.HandlerMethodReturnValueHandlerComposite
- org.springframework.web.servlet.handler.HandlerExceptionResolverComposite
- org.springframework.web.servlet.view.ViewResolverComposite
composite 对象的作用是,将分散的调用集中起来,统一调用入口,它的特征是,与具体干活的实现实现同一个接口,当调用 composite 对象的接口方法时,其实是委托具体干活的实现来完成
6. Spring 中的 Decorator
定义 Attach additional responsibilities to an object dynamically. Decorators provide a flexible alternative to subclassing for extending functionality
典型实现:
- org.springframework.web.util.ContentCachingRequestWrapper
7. Spring 中的 Proxy
定义 Provide a surrogate or placeholder for another object to control access to it
装饰器模式注重的是功能增强,避免子类继承方式进行功能扩展,而代理模式更注重控制目标的访问
典型实现:
- org.springframework.aop.framework.JdkDynamicAopProxy
- org.springframework.aop.framework.ObjenesisCglibAopProxy
8. Spring 中的 Chain of Responsibility
定义 Avoid coupling the sender of a request to its receiver by giving more than one object a chance to handle the request. Chain the receiving objects and pass the request along the chain until an object handles it
典型实现:
- org.springframework.web.servlet.HandlerInterceptor
9. Spring 中的 Observer
定义 Define a one-to-many dependency between objects so that when one object changes state, all its dependents are notified and updated automatically
典型实现:
- org.springframework.context.ApplicationListener
- org.springframework.context.event.ApplicationEventMulticaster
- org.springframework.context.ApplicationEvent
10. Spring 中的 Strategy
定义 Define a family of algorithms, encapsulate each one, and make them interchangeable. Strategy lets the algorithm vary independently from clients that use it
典型实现:
- org.springframework.beans.factory.support.InstantiationStrategy
- org.springframework.core.annotation.MergedAnnotations.SearchStrategy
- org.springframework.boot.autoconfigure.condition.SearchStrategy
11. Spring 中的 Template Method
定义 Define the skeleton of an algorithm in an operation, deferring some steps to subclasses. Template Method lets subclasses redefine certain steps of an algorithm without changing the algorithm’s structure
典型实现:
- 大部分以 Template 命名的类,如 JdbcTemplate,TransactionTemplate
- 很多以 Abstract 命名的类,如 AbstractApplicationContext